Alternative patching method for Valkyria Chronicles 3
Valkyria Chronicles 3 has received a fan translation back in 2013. As mentioned by Belmondo in a Wololo forums thread in 2016, it relies on a modified eboot.bin that could load pre-decrypted assets from a CPK renamed to data.bin. While this method is working, it relies on custom eboot and injects a legacy prometheus extension that was originally designed to run games that require firmware 6.xx on firmware 5.50 to boot the game.
Since 2016, when you could mod a PSP running firmware 6.61, this seems like a suboptimal option. Luckily for us, back in 2016 aforementioned Belmondo had released a PGD decrypter/encrypter tool that we can use to natively inject VC3 fan translation into the game ISO. Since for whatever reason I was unable to find an existing guide on this procedure, I have documented it myself.
Prerequisites
- A "Valkyria Chronicles 3: Extra Edition" ISO (must have a "ULJM-05957" game code)
- Original release of VC3 English patch
- UMDGen
- Belmondo's PGD Encrypter
- Criware File System (I cannot link it directly so you will have to find it yourself)
Unpacking game data archive
- Open VC3 ISO in UMDGen and extract a
PSP_GAME/INSDIR/DATA.BINfile - Put it next to
pgdecrypt.exefrom PGD Encrypter archive and launch pgdecrypt - If decryption succeeded, there will be a new
DATA.BIN.decryptfile. Rename it toDATA.CPK - Start CPK File Builder and press F7 to launch a CPK file viewer
- Open
DATA.CPKfrom step 3 and extract all files from it to some directory - Delete the original
DATA.CPK(do NOT deleteheaderandvkeyfiles!)
Patching game data
Copy all the files from RESOURCE/patch directory inside VC3 English patch into data directory from the previous step, replacing all existing files. Patching itself is now, technically speaking, complete. However, to make this patched data usable, we have to pack it all back into a CPK archive. There are two options to do it: replicating original build process using CPK File Builder or packing everything in a quick and dirty way using CRI Packed File Maker.
CPK File Builder
Using builder it is possible to deduplicate files in data directory during build process. This adds an extra step in the process so building a CPK takes more time but the resulting file size is smaller and the archive's structure is much closer to the original archive we have unpacked in step 5. I would recommend going with that option for producing "final builds" because it will result in the cleanest archive we can get without relying on the original CRI project file which is not public.
To do this you will have to:
- Add files to a blank File Builder project (Ins)
- Click "Select Local Files"
- Step into the data directory from step 5 of the data unpacking section
- Select all files (Ctrl+A)
- Click "Open"
- Click add files in the main "Add Files" dialogue window
- Select all files (Ctrl+A) in the project window, right click on selection and click "Test File Compression" option (or use Ctrl+T shortcut)
- Press F5 or click a "Build CPK" button to open "Build Settings" dialogue
- Input or select path to your future archive
- Set "File Mode" to "Filename Only"
- Set "Data Alignment" to 2048
- Set "File Unification" to "Unifies redundant files all"
- Open "Other Settings", tick "Removes Local File Information" and "No file Date Time information" checkboxes and click Ok
- Click "Clean Build"
At this point the build will start. In some "releases" of CRI FS tools, an error may pop up at this point. Click on "details" button and if it says System.InvalidOperationException: Form that is already visible cannot be displayed as a modal dialog box, just ignore it by clicking "Continue". If there is some other error, your version of CRI FS tools is corrupt and you will have to find another one.
CRI Packed File Maker
Using maker is a bit faster but the resulting file size is larger. I would only recommend using it if you want to try editing game resources and checking the results of your work. To use it you will have to:
- Open data directory from step 5 of the data unpacking section in maker
- Click "Build CPK file" button
- Input or select path to your future archive
- Set "Data Align" to 2048
- Set "File Mode" to "Filename"
- Optionally uncheck "Try compression" if you don't care about space but don't want to lose time
- Click "Start to Build"
Rebuilding game ISO
- Put repacked game data archive next to
pgdecrypt.exefrom PGD Encrypter archive, rename it toDATA.CPKand launch pgdecrypt - Rename resulting
DATA.CPK.encrypttoDATA.BIN - Extract template ISO from
RESOURCE/patch/umd_replace/01.zip - Extract
PIC0.PNGfromPSP_GAMEdirectory inside the template ISO - Open VC3 ISO in UMDGen and replace
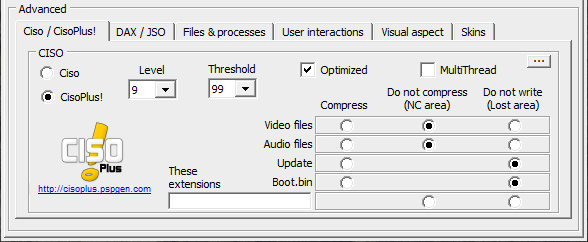
PSP_GAME/INSDIR/DATA.BINandPSP_GAME/PIC0.PNGwith the files from steps 2 and 4 respectively - Save resulting image as an ISO. If you want to get a CSO, compress it with YACC afterwards instead of using built-in UMDGen compressor. Here are the recommended compression settings: